If an instrument you are expecting to see is not shown in the BenchVue Instrument Panel, launch Connection Expert to manually add that instrument to your configuration – usually for serial (RS-232) instruments and LAN instruments that are not on your local subnet or are older LAN-based instruments. Note that if one of your instruments was discovered at an earlier time but communication can no longer be established with that instrument, it will not be shown in Connection Expert. In most cases, this means that the instrument has been disconnected or turned off. If you are experiencing connection issues with an instrument, be sure to verify that the instrument is turned on and is properly connected to the selected interface. Then try refreshing the instrument list in BenchVue by clicking the Refresh button at the bottom right corner of the Instrument Panel.
For more information on troubleshooting connectivity issues, click the appropriate link below:
Troubleshoot PXI Modular Instrument Connections
Troubleshoot Serial (RS-232) Connections
Note: To further troubleshoot connectivity issues, use the Troubleshooting Wizard, which is installed with BenchVue. To launch the wizard from Windows, go to Start > All Programs and then navigate to Keysight BenchVue > Keysight BenchVue Troubleshooting Wizard.
Below is a list of common connectivity issues to review if you are having problems connecting your instruments to BenchVue.
Verify IO Communication - Verify that you can communicate with your instrument using Keysight Connection Expert. To start Connection Expert, go to the "Manage Your Bench" icon in the lower right corner of the BenchVue application and select "Launch Connection Expert". For more information on using Connection Expert, see the Connection Expert Help.
Check Proxy Settings - Proxy servers are commonly used to control access from an internal network to the external Internet. In some situations, you may not be able to establish communication with an instrument if you are using a proxy server. By default, BenchVue uses the proxy settings configured for your computer.
Supported Instruments - Although we are continually adding support for new instruments, BenchVue does not currently support all Keysight instruments. For a complete list of instruments supported by the BenchVue application, go to www.keysight.com/find/BenchVueInstruments.
Keysight IO Libraries Suite - From the Windows Control Panel, uninstall the following two shared components: (1) IVI Shared Components and (2) VISA Shared Components. Then perform a "Repair" (not "Modify") of Keysight IO Libraries Suite, which will reinstall the two shared components.
Keysight IO Libraries Suite and NI MAX - If National Instruments Measurement & Automation Explorer™ was previously installed and then removed in a "side by side" installation with Keysight IO Libraries Suite, you will need to restore some missing files. From the Windows Control Panel, find Keysight IO Libraries Suite and then select "Modify" (not "Repair") to restore the missing files.
Keysight USB/GPIB Converter and NI MAX - If you are using the Keysight 82357B USB/GPIB Interface Converter with National Instruments Measurement & Automation Explorer™, make sure to select the "Passport to Tulip" option in NI MAX.
Keysight USB/GPIB Converter and Addresses to Avoid - If you are using the Keysight 82357B USB/GPIB Interface Converter, avoid the following GPIB addresses: 9, 11, 13, 25, 27, and 29. These addresses do not always respond correctly to a Serial Poll operation which BenchVue uses. Note that some Keysight instruments, such as the Keysight 34970A, use "9" as their default GPIB address; be sure to change the address to ensure proper operation.
Refresh LAN Connection - If you are connecting to your instrument via LAN, right-click on the instrument icon in the BenchVue Instrument Panel and then select "Refresh" from the menu bar. This will split the device into multiple instrument icons on the Instrument Panel, each with a different communication protocol (e.g., Sockets, HiSLIP, and VXI-11) – select the instrument icon with the VXI-11 protocol.
PXI Modular Instrument Connections - In order for BenchVue to recognize and communicate with a PXI modular instrument, you must first enable the HiSLIP interface from the instrument's Soft Front Panel (SFP). For more information, see Connecting to PXI Modular Instruments.
Verify RS-232 Settings - If you are connecting to your instrument via RS-232, make sure you have configured the COM port settings on your computer to agree with your instrument settings (baud rate, parity, etc.). Since some instruments work best with handshaking enabled, you might also try using a USB/RS232 interface converter (such as the FTDI US232R-100 converter). Make sure you have installed the correct driver for the USB/RS232 interface converter and that it shows up in Windows Device Manager.
Install Latest Instrument Firmware - Make sure your instrument firmware is up to date. To check for the latest instrument firmware from the BenchVue application, right-click on the instrument icon in the BenchVue Instrument Panel.
Verify User Login - Make sure that you are logged into your computer with the same User Name as your last session. If BenchVue is running while a second user logs into the same computer, the second user will not be able to launch the BenchVue application.
Instruments connected via USB are auto-discovered and automatically appear in the BenchVue Instrument Panel. After verifying that the instrument is turned on and the USB cable is properly connected, refreshing the instrument list in BenchVue should resolve any issues.
Note: When an instrument has been discovered and is properly connected, a green check will be displayed next to the corresponding instrument icon in the BenchVue Instrument Panel.
A GPIB instrument is defined as any instrument connected to one of the following interfaces:
After verifying that the instrument is turned on and the GPIB cable is properly connected, click  from BenchVue to launch Connection Expert and manually add the instrument.
To change properties of a device that you have already added, or to edit properties of an interface, select Edit Existing Instruments/Interfaces.
Note: When an instrument has been discovered and is properly connected, a green check will be displayed next to the corresponding instrument icon in the BenchVue Instrument Panel.
Instruments that are not on your local LAN subnet must be manually added to your configuration. In addition, some older instruments on your local subnet may not be found via auto-discovery. To ensure that auto-discovery is effective, be sure to verify that AutoIP is not used in any instrument. Also, if your computer has multiple Network Interface Cards (NICs), be sure to verify that each NIC has a different network address.
You can connect your instruments to a private LAN or to a site LAN.
When you are connecting a new instrument to your network (private or site LAN), you have several options. Click the links below for more information.
After verifying that the instrument is turned on and the LAN cable is properly connected, click from BenchVue to launch Connection Expert and manually add the instrument.
Note: If you do not test the connection when you manually add a LAN instrument, you may not see the instrument's identifying information (model number, manufacturer, and serial number) in the Connection Expert Instruments view. To be sure of seeing the identifying information, test the connection when you are adding the instrument. If you have not tested the connection and the instrument is displayed in the Instruments view as Unknown Instrument, you may be able to identify the instrument by clicking Rescan. Note that if a model number is discovered when you do this, the instrument will be re-sorted in the list according to the model number, so it will move to a new position in the list of instruments.
Note: When an instrument has been discovered and is properly connected, a green check will be displayed next to the corresponding instrument icon in the BenchVue Instrument Panel.
In order for BenchVue to recognize and communicate with a PXI modular instrument, you must first enable the HiSLIP interface from the instrument's Soft Front Panel (SFP). For more information, see Connecting to PXI Modular Instruments.
A serial instrument is any instrument connected to an RS-232 COM port on your local computer. Instruments connected via an RS-232 port are not auto-discovered by the Instrument Discovery Service and must be added manually.
After verifying that the instrument is turned on and the RS-232 cable is properly connected, click from BenchVue to launch Connection Expert and manually add the instrument.
To change properties of a device that you have already added, or to edit properties of an interface, select Edit Existing Instruments/Interfaces.
Note: When an instrument has been discovered and is properly connected, a green check will be displayed next to the corresponding instrument icon in the BenchVue Instrument Panel.
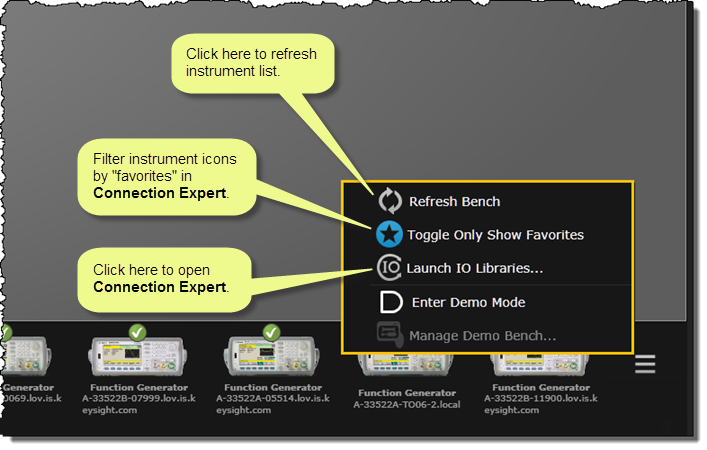
If you are filtering the list of instruments in BenchVue using "favorites", make sure that the instrument you are looking for is selected as a "favorite" in Connection Expert.
Click the Show Favorites button to toggle the list of "favorite" instruments on or off (not available in the Demo Mode). Favorites are those instruments that you plan to use frequently and you have marked them with a gold star  in Connection Expert. From BenchVue, a blue star
  indicates that the instrument list is currently being filtered based on the selected "favorites"; a gray star
  indicates that all discovered instruments are currently shown in the instrument list.
When an instrument is added to the Instruments view as a "favorite" in Connection Expert:
Note: For more information on using Connection Expert, see the Connection Expert Help.
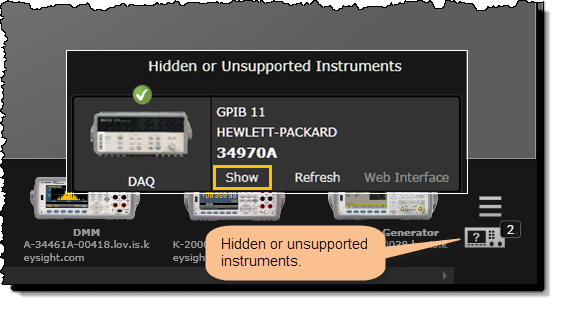
Make sure that the instrument you are looking for is not set to Hide.
To view the current status of Hidden or Unsupported instruments, click  at the bottom right corner of the Instrument Panel. To enable a Hidden instrument, click the icon and select the Show button.