How to Use the Scripting Tool
Last Updated: 2011-06-23
The scripting tool is designed to automatically create short scripts (or macros) for you based on the attributes and settings you have configured for a specific activity in the Interactive Testing tab. It is possible to create complex scripts directly in the scripting tool. However, if advanced scripts are needed, to control a .dll for your wireless device for example, you may prefer Visual Basic in the .NET programming environment to create the script as it provides many more tools than are provided in the scripting tool to help you create advanced scripts. You can import any .NET script into the scripting tool.
This topic discusses the following:
Using toolbar icons in the scripting tool
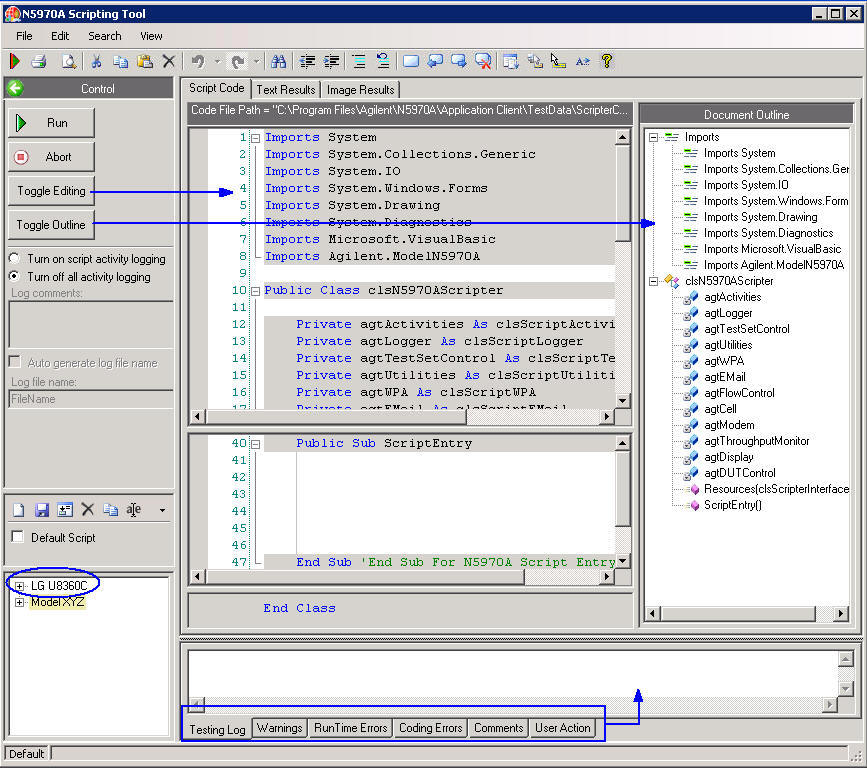
Once the scripting tool is open, a screen similar to the one below should appear. The toolbar contains the basic printing and editing options as well as basic programming options such as commenting/un-commenting a selection of code, adding bookmarks, and displaying information such as the object member list.
Scripting tool toolbar icons (top of scripting tool):
-
Run with debugger - allows you to choose a debugger to troubleshoot your script file. See How To Debug Scripting Tool Files for more information.
-
Print - The script files can be printed in two parts: 1) references and the private subroutines (this is the editing window that appear when you click Toggle Editing) and 2) Public subroutines. That part that is printed depends on which window your cursor is located in. If the cursor is not located in one of the two options mentioned, the print icon is disabled.
-
Print Preview - displays a preview of how the printed output will appear. The print preview that is displayed is for the window that the cursor was in when the print preview icon was clicked. There are two options: 1) references and the private subroutines and 2) Public subroutines. If the cursor is not located in one of the two windows mentioned, the print preview icon is disabled.
-
Cut - deletes the selected text and places it on the clipboard.
-
Copy - places the selected text on the clipboard.
-
Paste - pastes the text that is on the clipboard to the location of the cursor.
-
Delete - removes the selected text.
-
Undo - reverses the previous user action.
-
Redo - reverses the Undo. You can redo the number of actions that have been undone. That is, if you have click undo once, you can only click redo once.
-
Find/replace - allows you to search for all or part of a search string that is entered into the "Find what" field and replace them with the characters that are typed into the "Replace with" field.
-
Outdent - reverse indents the selected lines by one indentation increment.
-
Indent - indents the selected lines by one indentation increment.
-
Comment selection - comments the selected lines of code.
-
Uncomment selection - uncomments the selected lines of code.
-
Toggle bookmark - adds or removes a bookmark on the selected line of the document in the active Editor. Does not alter the line of code bookmarked.
-
Previous bookmark - moves the cursor to the beginning of the line where the previous bookmark is located. When the first bookmark in the file is reached, it jumps ahead to the last one in that file.
-
Next bookmark - moves the cursor to the beginning of the line where the next bookmark is located. When the last bookmark is reached, it jumps back to the first one in that file.
-
Clear bookmarks - removes all bookmarks.
Intellisense features:
-
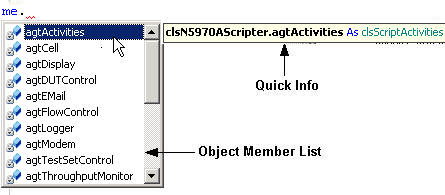
Display an object member list - displays a list of valid object members. When a member from the list is selected, you can press ENTER to insert the selected object member into your code. An example is shown in the figure below. The "Me." induces the Visual Basic's Intellisense feature.
-
Display parameter info - opens the Parameters list to give you information about the number, names, and types of parameters required by a function or attribute. The parameter in bold indicates the next parameter that is required as you type the function.
-
Display quick info - displays the complete declaration for any identifier in your code. Move the mouse so that the cursor is over an identifier to display Quick Info for that identifier, which appears in a yellow pop-up box. An example is shown in the above figure.
-
Display word completion - types the rest of a variable, command, or function name once you have entered enough characters to distinguish the term. Type the first few letters of the name, and then press the Display word completion icon. If what you have typed has more than one possible match or no match at all, then invoking this icon displays the object menber list, which you can then use to find the term and insert it into your code.
Scripting tool menu items
File
This menu allows several of the standard File menu items including: Print..., Print Preview..., Page Setup... , and Exit .
Edit
This menu allows several of the standard Edit menu items including: Undo, Redo, Cut, Cut/Append, Copy, Copy/Append, Paste, and Delete.
Additional menu non-standard menu items include:
-
Mark Line Modifications- inserts a change bar for the lines where modifications have been made.
-
Highlight Current Line - highlights the line in which the cursor is located.
-
Show Column 80 Guide - when this is selected a horizontal line is displayed in the 80th column.
-
Advanced: This option allows several standard Visual Basic options, these include: Indent, Outdent, Convert Tabs to Spaces, Convert Spaces to Tabs, Tabify Selected Lines, Untabify Selected Lines, Comment Selection, Uncomment Selection, Make Uppercase, Make Lowercase, Toggle Case, Capitalize, Delete Horizontal Whitespace, Trim Trailing Whitespace, Delete Line, Duplicate Line, Delete Blank Line.
-
Bookmarks - allows you access to the bookmark controls, such as Toggle Bookmark, Enable Bookmark, Previous Bookmark, Next Bookmark, Clear Bookmarks.
-
Insert File as Text... - allows you to select a file to insert as text.
-
Insert Snippet (see step 6 below for information on how to insert a code snippet)
-
Add Advanced References
Search
-
Find/Replace - allows you to enter a search phrase to find, as well as an option to replace any instance of that search term.
-
Incremental Search - searches for the first instance of the search term that follows the highlighted search phrase.
-
Reverse Incremental Search - Searches for the first instance of the search phrase that precedes currently highlighted search term.
-
Go To Line... - Moves the cursor to the specified line.
View
-
Outlining - This item provides access to the outlining controls, including:
-
Hide Selection - collapses currently selected text. This option only applies if automatic outlining has been stopped.
-
Toggle Outlining Expansion - reverses the current outlining state of the innermost selection in which the cursor lies.
-
Toggle All Outlining - sets all sections to the same outlining state. If some sections are expanded and some are collapsed, then all be come collapsed.
-
Stop Outlining - stops outlining the components that are added.
-
Stop Hiding Current - removes outlining information for the currently selected selection. This option only applies if automatic outlining has been stopped.
-
Start Automatic Outlining - restarts automatic outlining after it has been stopped. This option only applies if automatic outlining has been stopped.
Help
The Control column (on the left side of the screen) shows the following:
Four main control buttons for the selected script:
-
Run - This button runs the selected script. If you need to debug your script, see How to Debug Scripting Tool Files.
-
Abort - This button aborts any currently running script.
-
Toggle Editing - This button toggles the script view in and out of edit mode. While in edit mode, the script shows a header and a main window. While not in edit mode, the script shows just the main window. Under the main window is another area where you can use the tabs to view information such as Testing Log , Warnings , RunTime Errors , Coding Errors , Comments (help you and others remember the purpose of the script; these also show up in the Stress Testing tab) and User Action (allows you to perform an action, such as press continue to proceed). The editing view is not shown by default.
-
Toggle Outline - This button toggles between showing and hiding an outline of the components for the selected script. The outline is not shown by default.
Activity Logging:
-
Turn on script activity logging - captures an activity log beginning when the Run button is pressed and ending when the script completes. Note: if this parameter is selected, any currently running activity log is stopped and a new activity log will be started.
-
Turn off all activity logging - stops any activity log that is currently being captured.
-
Log comments - this contents of this field (up to 10 lines in length) constitute the first message of the activity log that is initiated when the Run button is pressed and Turn on script activity logging is selected.
-
Auto generate log file name - automatically assigns a timestamp of the current time and date as the file name.
-
Log file name - this field allows you to enter a custom name for the activity log. Note: this file name will not be used if the Auto generate log file name is selected.
Continuing down the Control column, the following options are available in the scripting tool to help you manage the scripts listed in the bottom portion of the Control screen:
-
-
Delete - any test plans that contains a deleted script as a test step are modified to no longer contain step; also you cannot delete whole groups at a time, you must delete all the scripts in a group before it is removed,
-
Import - allows you to import any N5970A structured script file. To import a file, click the Import icon. This opens an explore window for you to select the desired files you wish to import.
-
Expand - expands entire list, and
-
Default Script - Default scripts are scripts that run automatically for a particular wireless device and format. If any are assigned, the default script(s) for a specific wireless device and format are ran when the Current DUT or Current Format is changed and they match the script configured for that device and format.
This checkbox allows you to select whether the selected script is assigned as a default script. Different default scripts can be applied to each wireless device. There can be several default scripts assigned to a wireless device. If more than one default script is assigned to a particular device, they are run alphabetically by file name. Default scripts are useful for setting up initial parameters for your wireless device.
To assign a script file as a default script, highlight the file and check the Default checkbox. Default files are indicated with a checkmark ( ).
).
The bottom portion of the Control column is a complete list of the wireless devices you have added to the Interactive Functional Test Software along with submenus of the format(s) they support (see How to Add a DUT). In each format submenu for the wireless device is a list of any available script files for that device and format. The available script files can also be organized into groups. You can move scripts and groups of scripts to different wireless devices by dragging and dropping them with your mouse.
Notice that some of the items in the list have a tan background and some do not. The items without a tan background apply to the Current DUT and Current format.
Creating scripting tool files
The most common way to create a script is to allow the Interactive Functional Test Software to automatically create scripts based on your current settings. It is possible to create complex scripts manually in the scripting tool, however it is recommended that it only be done by advanced users who are familiar with the programing in the Visual Basic .NET environment.
Note: scripting tool files are created and edited in the Script Code tab of the scripting tool. For information on how to send results from the scripting tool files to the Text Results and Image Results tabs, respectively, see using the Text Results and Image Results tabs in the Scripting tool.
To create a script file:
-
Open the scripting tool by clicking the scripting tool icon in the tool bar,  .
.
-
In the Interactive Functional Test Software Scripting Tool window, create a new script by clicking  . This will prompt you for the script name and the group name (if any) that you would like to associate the script with. The new script is added to the list of scripts for the wireless device selected as the Current DUT and in Current Format submenu. If necessary, add a comment to help distinguish the script file.
-
In the N5970A Interactive Functional Tester window (the main window):
-
In the Interactive Testing tab, or any other parameter that has a blue arrow next to it, and choose the activity you want to create a script for.
-
Click and hold the blue arrow,  , next to the action you want the script to perform. (If the scripting tool is not yet opened, clicking on the blue arrow will also open it.)
-
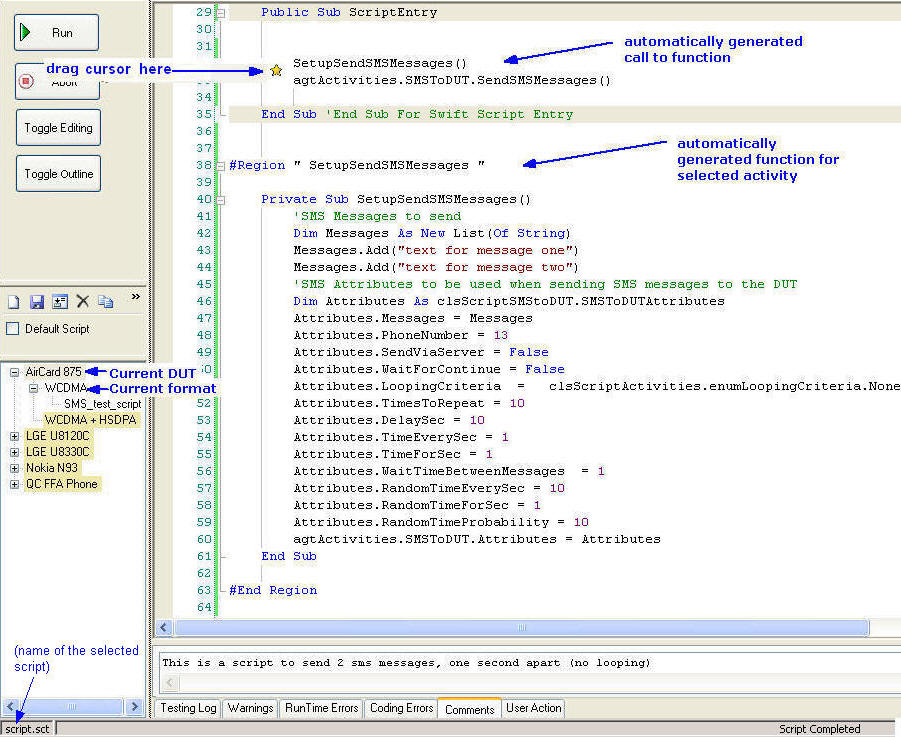
Then, drag your cursor from the Interactive Functional Test Software main window to the Scripting Tool window appropriate place between the "Public Sub ScriptEntry" declaration and the "End Sub" (for Script Entry) in the scripting tool. Automatically generated functions are listed below the subroutines and are collapsed.
-
Repeat steps a through c for any other activity you want to add to the script file.
-
In the Interactive Functional Test Software Scripting Tool window, expand the automatically generated functions and change parameters as necessary.
|

|
When a script is run, parameters that are changed in the scripting tool are also changed in the Interactive Functional Test Software's main window, not vice versa.
|
-
There are several code snippets available to you if you need to add to your script file. To view the available snippets, right-click in the script file and select Insert Snippet.

To view Visual Basic's Intellisense feature, which is a list of all the object members available for the specific item, type in "me." in the entry point subroutine called "ScriptEntry"and the list should display.
If the attributes have Wait for continue selected, you can press continue either in the scripting tool or the Interactive Testing screen of the Interactive Functional Test Software.
The above figure is just an example of the many snippets available to you. You can also perform any command that you can perform from the command line screen, such as ping, within the Scripting tool (this can be done using the snippet N5970A>>Command Line Control).
-
Test the script file by clicking the Run button in the Interactive Functional Test Software Scripting Tool window. The Activity tab on the Interactive Functional Test Software main window displays the activities that are started from the script file. Also, the Interactive Functional Test Software's title bar also indicates that a script is currently running.
|
|
The non-time limited activities, which are Network Impairments and Battery Profile, will terminate when a script file ends. This is regardless of whether the non-time limited activity was initiated in or before any script file.
|
Example:
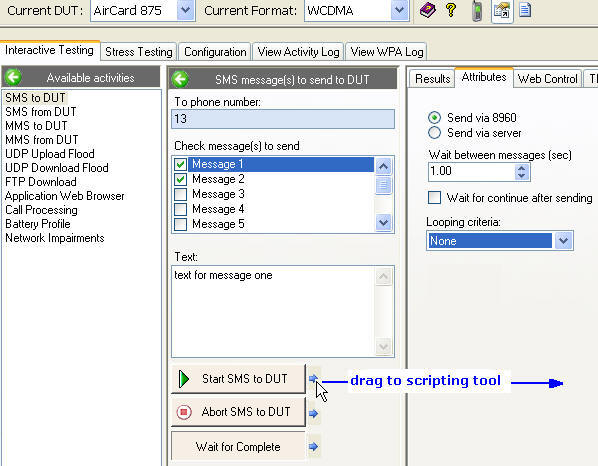
This example creates a script to send two SMS message to the wireless device (SMS to DUT) with a 1 second delay between sending the messages. The setup is shown in the figure below. Not shown is the Text for Message 2, which is "text for message two".
To create a script that sends the selected messages in the Check message(s) to send, that also has the same attributes and settings that have been configured:
-
Set up the SMS to DUT screen as shown above.
-
Open the scripting tool.
-
In the scripting tool, add a new script and name it SMS_test_script. Notice the location of new files in the list depend on the Current DUT and Current format settings. Also notice, that the actual name is in the format Current DUT_Current format_Group_Name.sct settings. The file location of the selected file is displayed above the opened script file.
-
In the Interactive Functional Test Software's Interactive Testing tab you simply drag the blue arrow next to the Start SMS Message button to the scripting tool between the "Public Sub ScriptEntry" declaration and the "End Sub" (for the Script Entry) of the Script Code tab.
-
Save the script.
The resulting script is shown below. A comment was added directly into the Comment tab window. This comment is displayed in the test step information column in the Stress Testing tab.
For more information on creating scripts, see How to Create Advanced Scripting Tool Files.
References the Interactive Functional Test Software imports into the scripting tool
The references that are automatically imported into the Scripting Tool for you to use are:
-
System
-
System.Collections.Generic
-
System.IO
-
System.Windows.Forms
-
System.Drawing
-
System.Diagnosis
-
Microsoft.VisualBasic
-
Agilent.ModelN5970A
The scripting tool allows you to add more references for writing more advanced scripts. To find out how, see How to Add an Advanced Reference to the Scripting Tool.
