Printing Screens
Last updated: January 15, 2009
Printing and Saving Screen Images
The test set's local area network (LAN) connection can be used to dump the currently-displayed screen image into a personal computer's web browser. The computer must either be connected to an existing LAN or have a LAN adapter installed that can be connected directly to the test set.
Computer Requirements for LAN Communications with the Test Set
The computer used to capture screen images from the test set must meet the following requirements:
Test Set to Computer Connections
The test set's LAN connection can be made at either the rear-panel LAN PORT or at the front-panel DATA port. When using the DATA port, be sure to have the factory supplied jumper cable installed between the rear-panel LAN PORT and the ETHERNET TO FRONT PANEL port.
Connections from the test set to the computer must be made using the correct type of LAN cable:
Capturing the Screen Image
-
Press the test set's
SYSTEM CONFIG
key to display the test set's LAN settings, and record the
LAN IP Addressfor use later in this procedure. - Start a web browser application on your computer.
- Display the test set screen that you want to capture.
-
Enter the following address/location into your web browser:
http://<lan address>/display.htm
where <lan address> is the LAN IP address of the test set . - Within a few seconds, the test set's screen image appears in your browser. If the image does not appear on your browser within 30 seconds, refer to Test Your LAN Connections and Configuration by "Pinging" the Test Set below.
-
To print the image, select
File,Print. - To save the file:
The image can now be retrieved from your directory and used as needed.
Test Your LAN Connections and Configuration by "Pinging" the Test Set
Perform this operation only if you were not successful in downloading the test set screen image into your browser.
-
Display the Command Prompt window on your computer. This is typically done in the Microsoft Windows operating system by selecting
Start->Programs->Command Prompts. -
At the command prompt, enter the following command:
ping<lan address>. The <lan address> is the test set's LAN IP address. (The command prompt does not have to be at the root (c:\) level before entering the command.)
This example shows what should happen when you enter the ping command for a test set with the LAN IP address of 111.22.333.44. The test set should reply back to the Command Prompt screen indicating that data was received.
-
If the message "
Request Timed Out" is displayed instead of a reply from the test set, try entering the command again. If the request times out again, your LAN connections are incorrect and/or your LAN settings for the two devices do not match.
Troubleshooting LAN Connections
If your web browser did not display the test set's screen, or you could not "ping" your test set from your browser, refer to the following information to find the cause and fix the problem.
Try Altering Connections
- If you are using the test set's front panel DATA port, make sure the jumper between the rear-panel LAN PORT and ETHERNET TO FRONT PANEL port is in place; or try connecting directly to the rear-panel LAN PORT.
- Try using a different type of LAN cable. If you were using a crossover cable, try using a standard LAN cable; if using a standard LAN cable, try using a crossover cable. If this doesn't fix the problem, be sure to replace the cable with the type recommended in Test Set to Computer Connections above.
Reconfigure the Computer and Test Set LAN Settings
If the test set's image is still not displayed on your web browser, and the ping command still indicates that the test set is not communicating with the computer, you need to verify that the LAN settings for the computer and the test set are compatible. The following sections provide general guidelines in getting the LAN settings configured for both instruments to communicate with each other.
Perform the configuration in the following order:
- Configure the computer's LAN settings.
- Restart Windows on the computer to start using the new LAN configuration.
- Configure the test set's LAN settings to work with the computer's settings. (It is important that the computer be configured and re-started before configuring the test set's LAN settings.)
- Turn the test set off and back on to make sure it finds the computer's newly-configured LAN card on power up.
- It is highly recommended that the Subnet Mask be set to 255.255.248.0 for the test set and the computer when using a direct computer-to-test set connection.
-
The first three groups of numbers for the LAN IP Address of the test set and the computer must match. Example; if the test set's LAN IP Address is set to 130.29.189.33, the computer's LAN IP address must begin with 130.29.189.
The number in the fourth group of digits in the computer's and test set's LAN IP Addresses must NOT match. Example; if the test set is set to LAN IP Address 130.29.189.33, set the computer's LAN IP Address to 130.29.183.34 (or 130.29.183.77, 130.29.183.42...- just so the last number is not also set to 33). The last entry in the IP Address must not be >254 or 0.
Changing the LAN Setting on Your Computer
Network configuration procedures vary between operating systems. You may have to refer to your computer's help system, or your LAN adapter card's documentation, for assistance.
Perform the following steps to alter the network settings for most PCs using a Microsoft Windows operating system.
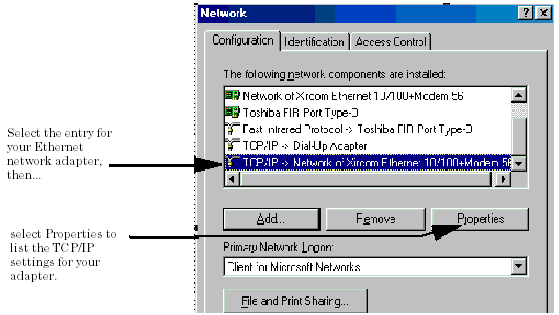
Access the Network Settings
-
Double-click on the
My Computericon on the Windows desk top. -
Double-click on the
Control Panelicon. -
Double-click on the
Networkicon. -
Select the
TCP/IP-> [your Ethernet network adapter] entry from the list of components. Note: Do not selectTCP/IP Dial-Up Adaptersettings if present. -
Select
Propertiesto access the TCP/IP settings screen.
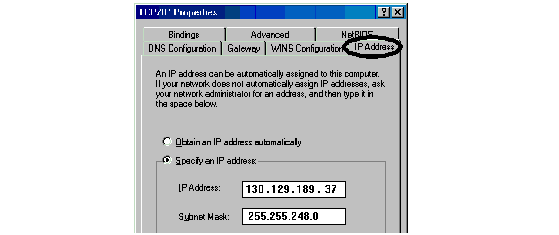
Set the IP Address and Subnet Mask
-
Select the
IP Addresstab on the TCP/IP Properties screen. -
Select
Specify an IP Address. - Enter the IP Address for the computer. Remember, the last entry in the IP Address must not be >254 or 0.
- Enter the Subnet Mask (255.255.248.0).
Remove Any Gateway Setting
-
Select the
Gatewaytab. - If present, remove any existing setting.
-
Click
OKuntil you have closed the Network settings window.

Restart Windows
Depending on your LAN network adapter, your computer may or may not apply the network configuration changes as they are made. It is import that you restart Windows NOW to make sure new LAN settings are in effect when you try to connect to the test set.
Changing the LAN Settings on Your Test Set
-
Press the
SYSTEM CONFIG
key on the test set to display the current LAN settings.
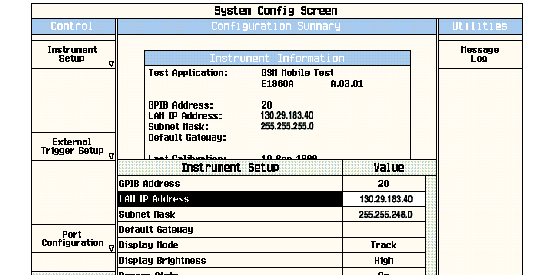
-
Press the
F1
(
Instrument Setup) key.
Changing the LAN IP Address may alter the Subnet Mask setting. Therefore, change the LAN IP Address first, then change the Subnet Mask. Also, The last entry in the IP Address must not be >254 or 0.NOTE
- Turn the knob to highlight the setting you want to change.
- Press the knob to select the setting.
- Enter the new value using the keypad, and press the knob to complete the setting.
- Turn the test set off and back on to start using the new settings.